Friday 17 August 2012

Painting on the side...


A little painting I've been doing on the side of devising dastardly tactics...


Necron Wraith Prototype;

Top Side Pictures above, showing the digital pattern and the attempt of NMM on the chassis.


A face only a mother could like...


Base will have rocks where the grey is and possible PVA over the lava haven't quite decided...

Friday 10 August 2012


EXCITING STUFF:

First video uploaded summarising some of the tactics already discussed but explained much better!

Video Instalment: Target Screening for fun and profit.

I suggest you watch in full screen to see the movements better


Ben / The reaaaaaal Cute Hydra

Thursday 9 August 2012


Understanding Tank Shock

Vehicles and rightly so have long been a major part of the 40k world. But without insulting you the readers intelligence I have found that people tend to be woefully ignorant on how tank shocking and ramming actually works.

To this end I realising I didn't understand it as well as I would have liked went and actually read the rules and surprise, surprise there were parts that screamed... "exploit me Ben, exploit me.."

On to the article:

The main thing to remember is that if you tank shock you cannot then disembark in that phase. As scoring units cannot claim OR contest if they are in a vehicle or fortification this becomes very important.

Scenario: There is an objective which you hold with your troops choice, however in his next turn he will get out with his far superior troop choice and shoot you off the objective, lets say your a squad of guardsman and there's a unit of purifiers in a rhino.


Right, in this scenario the green has blockaded the blue rhino to cover the important area's 1. you need to ensure you have a model within an inch of all access points, this prevents them disembarking. B. you need to have a model on each edge so to force a tank shock else they can just drive off.

Scenario will go something like this: your opponent "I'm going to tank shock your unit"
You: I pass the leadership I don't death and glory (The last thing you want is to destroy the vehicle!)
Them: Right I'm now disembarking.
You: No your not, if you tank shock you can't disembark...

Undoubtedly your opponent will then look this up.. but in 6th edition with units not being able to claim inside a vehicle this can become a lot more relevant and allows you the cunning player to trap their unit in a transport for that vital turn :)

The trick is to force the tank shock and then neatly get out of the way and laugh as they are unable to use 200pts of their army as it's stuck in a rhino :)

Tip: Don't be afraid to assault the unit just because you can't hurt it. It allows you to A. Go within an inch of their rhino and stay there and B. Allows you an extra 2d6 move! If you do somehow wreck it the rhino and the contents will be destroyed as per the failure to disembark due to conflicting control zones rule.

See: http://www.dakkadakka.com/wiki/en/Playing%...ut%20the%20luck 

for full details on this until I can update this blog to the same level.

As ever followers and comments welcome

C-Hydra

Wednesday 8 August 2012

Coherency and sight shielding


Hey hey,

Today I am going to look at the basics of coherency and target screening.

Okay first things first, the rules nicely state that you can only shoot and kill models that your unit can see.. Makes some kind of sense as opposed to in previous editions where their mates would walk into fire...

So this has to be have a practical use for the shooter; of course it does!

The basics:


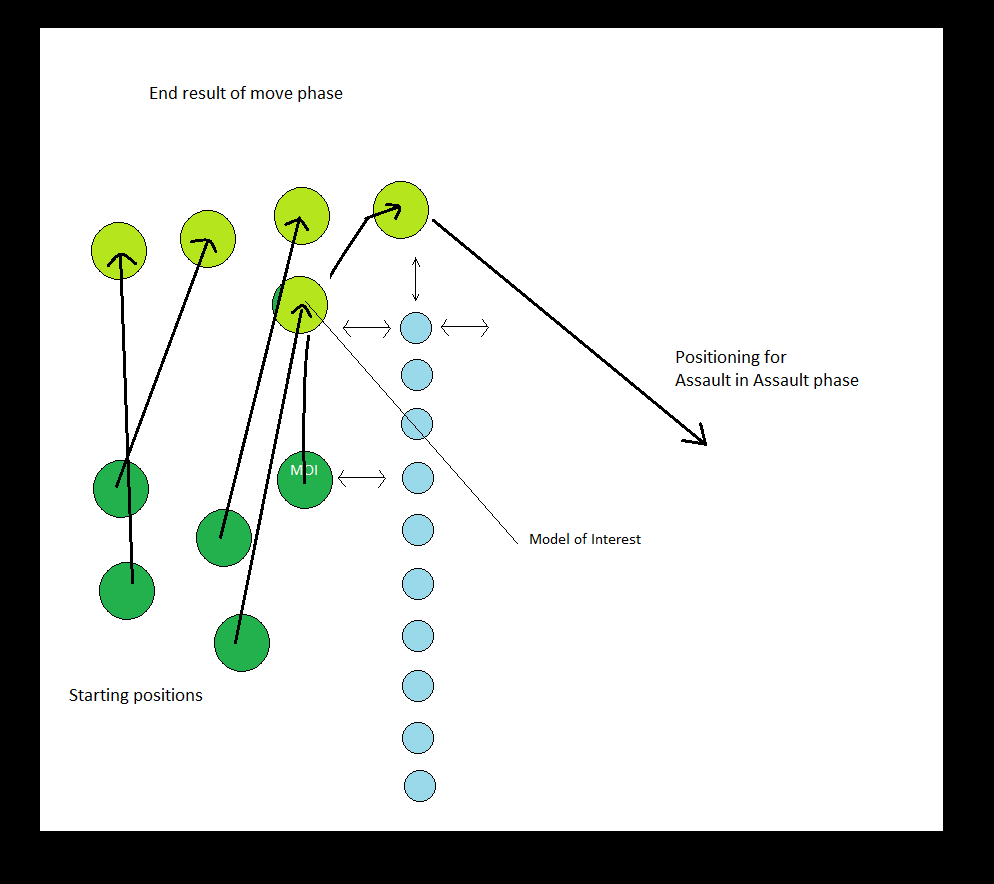
Right so green is firing at the blue, and in this case they are specifically interested in trying to kill the model of interest be it a crucial meltagun etc.

The Green use their rhino which is an expendable 35pt moving wall of light of sight blocking goodness!! Now as you can see when the green unit shoots the closest model is now the model of interest not one of the upper marines which would otherwise be closer. This should only be used if you don't have overwhelming firepower but should get a few kills and allows you to narrow down your target. (who needs snipers)


Right more advanced versions!

How to abuse the consolidation rule: the consolidation rule means that if there unit is out of coherency in their next movement phase they must move to rectify it... which is great if they are a unit of longfangs etc.

See below:


Now this trick involves using your trusty rhino to shield two models meaning it's not random. Then shooting the chaps in the middle if you can drop 2 then you should be able to create a lack of coherency, 1 will do it if the unit is spaced out.

Then in the opponents turn the blue unit must move into coherency meaning they snap fire with their heavy weapons.

Now we look at a slightly more advanced option of abusing coherency.


Right in this diagram two squads are ganging up on one. However the combined might should cripple but not wipe the squad out. So you need to find a way to tie the unit up until your next turn so you can deal with it.

So you lap around one model with your A. Squad, this unit DOES NOT fire in the shooting phase.

Your second squad preferably armed with decent shooting weapons fire at the squad as seen. However the model on the end in shielded from sight by your other squad. Whilst it is very likely that your spindly guardsman will not block line of sight, what they do do, is confer a cover save due to concealment. Therefore you opt to focus fire at everyone else. Meaning the model of interest is safe to shooting.

So at the end of the shooting.


Right so you have cut a major hole in his unit leaving one model isolated. Then you assault the single model ganking him with your unit vs. 1 rank and file. Whilst the rest of the unit are unable to join the fight as they only move 6 in. Then in their turn the full unit moves into combat wipes your squad and consolidates leaving him open for shooting in your turn.

Tip: in some cases you may want to move your assaulting squad AWAY from the man he's going to assault with the spare men as you'll only be able to get 4-5 men into combat with the man on the end (so typically these will be the ones shielding him) and the last thing you want is the rest of the squad being forced to charge the marines sulking on the other half of the gap because you rolled an 11 for charge range!

I only used guard as a good example but as ever any of these tactics can be recreated with a lot more units that the examples given.

The footprint


The footprint: 

The majority of these tactics revolve around the footprint: that is the 1inch bubble that all your models create. That is to say that the rules state that you cannot enter within an inch of an enemy model unless assaulting.

As ever with all rules there are usually exceptions to the rule, but by understanding the rules you can play 40k as a game of absolutes not probabilities. 


Tactic: OBJECTIVE Defense

For example: It's turn 7 and you have two units of 10 guardsman on an objective. Your buddy across the board has a squad of assault terminators 6 inches from your guardsman. The chances of rapidfiring the terminators to death is slim at best even with overwatch. However, what you can do is move one unit to stand an inch away from the terminators preferably 5+ inches away from the objective. They spread out so there is no way that the terminators are able to walk around them and still assault the other unit of guardsman which will stand on the objective. 

The principle is simple: your opponent can't get to the other squad which is on the objective as the other squad is in the way. However, he will be allowed to assault, meaning he will in all likelihood slaughter the brave martyrs. Meaning in all likelihood they will get to consolidate. You could hope that he rolls a 1 and cannot reach the 3inch mark to contest but this seems poor chances. 


Therefore whilst it is imperative that your first unit spreads out to block them, the second unit expands as much as possible using their 1 inch bubble to protect the objective.

Diagram shown below:


Right so the theory here is simple, you need one turn to win, therefore you abuse your footprint to hold up the terminators and hope the game ends or it's already turn 7. 


Couple of thoughts: it seems that the key is to place your models within the radius of the contestion zone to therefore claim but increase the distance to the threat. 

So let's look at some more advanced theory: namely what to do if you have more or less models.

First of all let's have a look at what your opponent can do:

Right formation of terminators in a pretty normal battlefield position.


Right the key points to consider:

First of all, the lead terminator has been labelled MOI for model of interest this will become apparent. 

For your opponent his best chance is to multi assault: this is the only way using only this terminator unit he has to break both squads.

[Multi Assault vs. run around] These are the two options the assaulting player has: 

The choice is simple: It's not really a choice, the rules state that if a model in a multi assault CAN charge the primary target in this case the vanguard then it cannot charge the secondary target, the objective. Therefore if your opponent does declare a multi assault, politely inform them that in this example it is impossible for them to charge the secondary unit as all of their models will easily be in coherency with the first unit.

The black pathway represents the most direct route around the squad. 


Please note that the model of interest has shifted now to the rear model, whilst the foremost is important to ensure the charge the MOI is now related to coherency. In the order of movement you would start with your foremost and then follow the conga line using the new MOI as the last model you move. 


Right, now looking at this we can see that the following is going to be true in a lot of cases therefore is worth doing exactly:


Right so the distance here to go around is going to be 2x A or A+C, or in simple terms half the relevant circle.

So the diameter is 25mm + 50.8m for a total of 75.8mm 

Circumference will therefore be 238.1mm. A+C is Circumference divided by 2 as it's only half a circle. 

So the resulted distance will be 119.5mm or 4.7 inches

Therefore we can calculate the total distance to get past the 1 inch bubble will be 4.7 inches + X where X is the distance from the model in question to the central point of the end model of the blockade. 


Okay... So what does this tell us: well we can easily work out how far they need to roll on their total to work out if they can charge. First measure the distance to your end unit of the blockade, then measure from the end point of the blockade to your unit, subtract 1.3 and that's what they need to roll on 2d6. 


So from the perspective of the aggressor how can we make things harder... Well first instead of giving them one lead point to calculate from use two, so instead of assuming a mixed formation form a line. 


This adds an extra variable into the equation and makes it harder for the defender to calculate completely. 


So now we look at formations for the defender: generally speaking with a ten man squad you can with as much movement as you like and 2inch coherency have a 30inch line... unfortunately the chances are you won't have the movement to do this.. so we need to look really at efficiency from a 6 inch move + a run move. It may be tempting to rapidfire those lasguns but sometimes running is the better option. (Though dropping the closest models is a valuable help too!)

Right so here we look at two extremes of example: the straight defence and the cornered defence:


The key here is that in both examples the guardsman have moved exactly the same distance from their starting position which is parallel an inch away from the aggressor. However, from a simple change in formation you can gain 2 inches more in the requirement the aggressor needs to get past you. 

This is because in the left example you are moving more efficiently diagonally while maintaining the 1 inch gap. The extra movement gained allows you to double row. Ensure that you keep the straight corner in as if you move diagonally but leave it out you recreate the second option at a slant. 

Remember the half circumference will be the same in both scenario's however in the left example you add 2 inches between your models.


Therefore the most efficient defence will look something like this: 


The tactic doesn't only work against terminators they are just a good example, it should work against any infantry unit and even beasts/cavalry as long as you can get enough movement denial to overide their 12 inch move. 

I think I have math hammered the living daylight's out of that tactic! Thanks for reading and as ever comments are always welcome! 

Introduction


Hi Hi, and welcome to my blog where I examine some of the principles of 40k and some useful tactics!

Any comments or additions would be really welcome!

Bit about the author: My name is Benjamin Salmon and I have played in the X-Legion and Throne of Skulls. I live in London and Northampton and frequent their GW's respectively.